# Overview
To understand how the wiki organizes the document space, two key concepts have to be explained: feeds and entries. A feed contains one or more entries and (optionally) other, nested feeds. One may compare it to a directory with attached metadata.
An entry is essentially a self-contained unit of content. It is stored in two parts: metadata and content. The data model does not impose any restriction on the format of the content. Right now AtomicWiki supports HTML, markdown, XQuery and image galleries as content types. Other formats could be easily added.
## URL Space
Every feed and entry has a short name, which is used to access it through an URL. For example, GettingStarted is the short name of this article, located in the help feed. You can navigate to the parent feed of this article by just removing the GettingStarted part in your browser's location bar.
Note that by convention, a feed's URL has to end with a / (otherwise the system will search for an article with the same name).
## Single Page or Blog?
One entry in a feed may be marked as an "index page". This entry will be shown as the default page if a user views the feed as a whole (and not a single entry).
If there is no index page, the wiki will display all entries in the feed in chronological order, so it will look more like a traditional weblog.
# First Steps
## Login
If you just installed AtomicWiki, there will be only one default user, called editor. AtomicWiki users are normal eXistdb database users, so you can use the user management tools which ship with eXistdb to change passwords or remove users, e.g. via the dashboard. The editor user is a member of the group wiki-admin and thus able to see the entire content of the wiki.
To start, log in to the wiki as user editor with password editor. You'll see that the navigation bar containing the menu has changed:

Menubar after logging in
## Create a New Feed
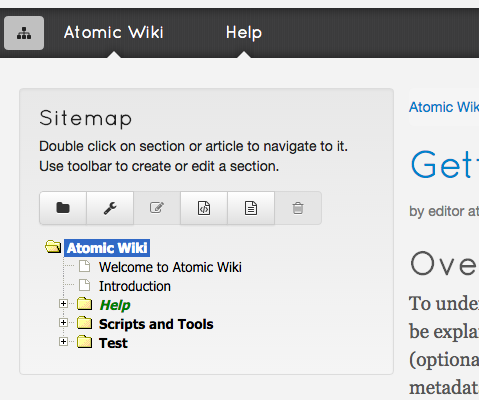
The sitemap panel
To create a new feed, open the sitemap by clicking on the button left of the menu. This shows a tree view of all wiki contents you have access to. Select the root entry, AtomicWiki, and click on the leftmost toolbar button.
A dialog will pop up, asking for information about the feed to be created. You must at least provide a Name and Title:
- Name: a name for the feed. This will be used to identify the feed in the URL, so it should be short and easy to type. Avoid whitespace or special characters.
- Title: a longer title, which will be shown in the sitemap as well as menu's
Once you confirmed the feed creation popup dialog, the new feed should show up in the sitemap.
## Create Your First Entry
There are two ways to create a new entry:
- in the sitemap, highlight the feed in the site tree and click on one of the two create buttons
- navigate to the feed by double clicking it in the sitemap. You should see a notice that the feed is empty. Use the
Admindropdown to the right of the menu bar to create a new entry.
At this point you have to decide if you prefer to write your entry in HTML or markdown. They provide slightly different features, so it will be best to experiment with both.
The general metadata fields at the top of the form are the same for both types of entries. As for feeds, you must supply a title and a short name. The short name will be used in the URL, so it should again be easy to write and remember. Don't use whitespace or characters which might not be present on every keyboard.
The tags field is optional and may contain some keywords to describe the entry. Right now tags are not used within the wiki itself, but they probably will in the future.
You can also mark the current entry as an index page: by selecting this option, the entry becomes the default entry for the feed, so whenever a user views the feed, he will see the index page entry. If there's no index page for a feed, AtomicWiki will display all entries in blog-style manner, i.e. ordered chronologically.