Database Backup and Restore
This article discusses eXist-db's database backup/restore procedures and related details
Overview
During backup, eXist-db exports the contents of its database (both XML and binary files) to a hierarchy of directories on the hard drive. This hierarchy is organized according to the organization of collections in the database.
There are two main methods for creating a backup:
- Server-side
Server-side Backups are run through eXist-db's job scheduler or triggered via the web interface. This type of backup extracts the data directly from the low-level database files. It is therefore much faster then a client-side backup and also provides support for incremental backups.
A server-side backup guarantees that the database is in a consistent state during backup. Possible corruptions in the database will be detected and the backup process will try to work around them. In many cases, damaged resources can at least be partially recovered. However it should be noted, that database operations will be suspended whilst the backup is in-progress.
- Client-side
You can use the Java Admin Client or a command line utility to create a Client-side Backup of the data on the server.
When the client controls the backup process, unlike the server-side backups, the server is not blocked and continues to accept requests from other clients. Other users can modify the db while the backup is running, so logical dependencies between different resources may not be preserved correctly. The client uses the XML:DB API to access the database. This means that it cannot backup documents or collections if they are damaged in any way.
Consider client-side backups a lightweight form of backup. During backup the database is not locked so people can keep working. However, the result may therefore be inconsistent. Client-side backups are not safe in terms of getting a complete and consistent copy of your data.
The format of the generated backup archives will be the same for both backup methods:
Resource and collection metadata is exported to a special XML
descriptor file, named __contents__.xml, with information including
resource type, owner, modification date and/or permissions assigned to a resource. You
will find one __contents__.xml file in each directory created by the
backup. This descriptor file is required to restore the backup. A full backup includes
index configuration files and user settings.
The location of the backup files depends on how the backup was initiated:
Backups via the dashboard or XQuery, are server-side backups, and write backups into the
exportdirectory inside the data directory of the eXist instance.The Emergency Backup Tool writes into
$EXIST_HOME/export, unless configured otherwise.Client Side backups done via the Java Admin Client are configurable with regards the location that the backup files should be written to.
Likewise, other methods (e.g.
Ant
                    tasks
) are also fully configurable.
Users can manually modify files in the backup directories without requiring special software. Any changes made to these files are reflected in the database after a restore (or when the data is imported into another database system).
Warning:
When migrating to a new eXist-db version, take care to use a version of the client corresponding to your server version. Usually, the backup process is backwards compatible. However, using a newer client version to create the backup from a server running an older version may lead to unexpected problems.
The backup process also generates a report. Normally this contains the list of collections which were backed up. If you notice any warnings or errors, it is especially important that you perform a “full restore” of your backed-up data onto the new installation of eXist, as described in the following steps.
Server-side Backups
Server-side backups are executed as system tasks, which means that when performing a server-side backup, eXist-db will do the following:
Wait for all pending transactions to complete.
Enter protected mode. No new transactions will be allowed. Concurrent requests by other clients will be blocked and added to the internal queue.
The system runs an automatic consistency check on the database.
Run the backup process.
Once the backup is complete, the database will switch back to normal service and all locks will be released.
Triggering backups using the Dashboard
You can trigger the backup using the Dashboard:
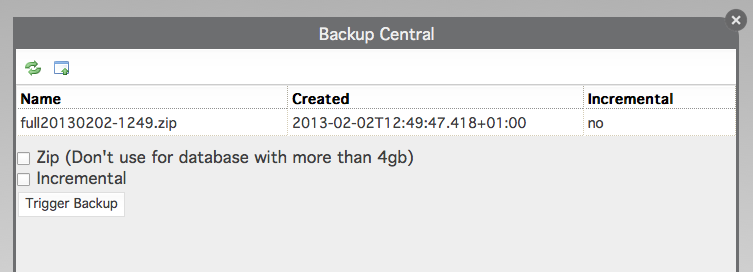
Clicking the Trigger Backup button will schedule a single server-side backup task.
You can click on Refresh to update the view, which lists all
backup archives currently available within the standard backup directory. Click on
the name of an archive to download it.
eXist-db can also create incremental backups, meaning only resources which were modified since the last backup are backed up.
The default storage directory is
$EXIST_HOME/data/export/. You can configure a different
directory in the configuration file conf.xml.
Scheduling Backups
You can use eXist-db's scheduler to
schedule server-side backup and consistency check tasks. To do this, add the
following definition to the scheduler section in the configuration file
$EXIST_HOME/etc/conf.xml.
<job type="system" name="check1" class="org.exist.storage.ConsistencyCheckTask" cron-trigger="0 0 0/12 * * ?">
  <parameter name="output" value="export"/>
  <parameter name="zip" value="yes"/>
  <parameter name="backup" value="yes"/>
  <parameter name="incremental" value="no"/>
  <parameter name="incremental-check" value="no"/>
  <parameter name="max" value="2"/>
</job>The time/frequency of the backup is specified in the
cron-trigger attribute. The syntax is borrowed from the Unix
cron utility, though there are small differences. Please consult
the Quartz documentation about CronTrigger configuration. The definition in the example means every 12
hours, starting at midnight.
The task accepts the following parameters:
- output
The directory to which the backup is written. Relative paths are interpreted relative to eXist-db's main data directory
$EXIST_HOME/data.- backup
Setting this to
yeswill create a full database backup (in addition to running the system checks).Setting this to "no" will not create a backup unless errors were detected during the consistency check. In that case the task will always try to generate an emergency backup.
- zip
If set to
yes, the backup will be written into a zip archive. Due to limitations of the zip format, archives larger than 4 gigabytes may not be readable.Setting this to
nowill create a backup on the file system which has no such limitations.- incremental
Setting this to
yeswill trigger an incremental backup. The first backup will always be a full backup. Subsequent backups will be incremental: only resources which were modified since the last backup will be saved.- incremental-check
By default, for incremental backups no consistency check is done because this may take too long. Setting
incremental-checktoyeswill enable consistency checking for incremental backups.- max
On incremental backup, create a full backup every
maxbackup runs. For eaxmple, if you set the parameter to2, a full backup will be performed after every two incremental backups.- dir
The directory to store the backup in. The path is relative to exist's default data directory.
- suffix / prefix
Start and end of the filename for a zipped backup.
- collection
The name of the instances' collection to be included in the backup.
- user / password
The username and password combination necessary for accessing the backup.
- zip-files-max
The maximum number of backups to keep in the backup location.
You can schedule more than one backup job. For example, an incremental backup could be done multiple e.g. every two minutes while a full backup is created once during the night.
<job type="system" name="databackup" class="org.exist.storage.BackupSystemTask" period="120000">
  <parameter name="dir" value="backup"/>
  <parameter name="suffix" value=".zip"/>
  <parameter name="prefix" value="backup-"/>
  <parameter name="collection" value="/db"/>
  <parameter name="user" value="admin"/>
  <parameter name="password"/>
  <parameter name="zip-files-max" value="28"/>
</job>
Triggering Backups from XQuery
System jobs can also be triggered from within an XQuery script using the
system:trigger-system-task function:
let $params :=
 <parameters>
   <param name="output" value="export"/>
    <param name="backup" value="yes"/>
    <param name="incremental" value="yes"/>
 </parameters>
 return
system:trigger-system-task("org.exist.storage.ConsistencyCheckTask", $params)This will schedule a backup to be executed as soon as possible.
Automatic Consistency Checks
The system task runs a consistency and sanity check on the database before a server-side backup. Reports of this check are written into the same directory as the backup archive. The last report can also be viewed using JMX (see Using JMX to View Check Reports).
The consistency check will first check the collection hierarchy, then scan through
the stored node tree of every document in the db, testing node properties like the
node's id, child count, attribute count and node relationships. Contrary to normal
database operations, the different .dbx files are checked
independently. This means that even if a collection is no longer readable, the tool
will still be able to scan the documents in the damaged collection.
The backup task uses the information provided by the consistency check to work around damages in the db. It tries to export as much data as possible, even if parts of the collection hierarchy are corrupted or documents are damaged:
Descendant collections will be exported properly even if their ancestor collection is corrupted
Documents which are intact but belong to a destroyed collection will be stored into a special collection
/db/lost_and_foundDamaged documents removed from the backup
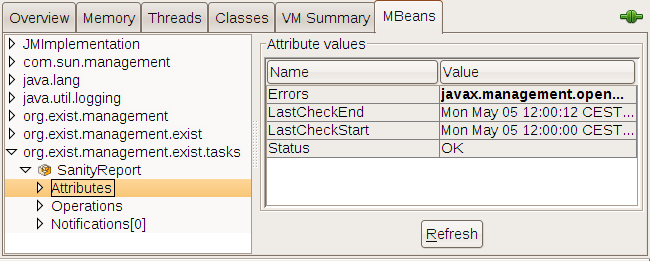
Using JMX to View Check Reports
If Java Management Extensions (JMX) are enabled in the Java VM that is running
eXist, you can use a JMX client to see the latest consistency check reports. The
screen shot below shows jconsole,(included with the Java
JDKs):
eXist also includes a command-line JMX client. Call it with parameter
-s to see the latest consistency report:
Unix/Linux:
$EXIST_HOME/bin/jmxclient.sh -s
Windows:
$EXIST_HOME\bin\jmxclient.bat -s
This may produce output as shown below:
Sanity report
-----------------------------------------------
                Status: FAIL
      Last check start: Thu May 08 21:40:00 CEST 2008
        Last check end: Thu May 08 21:40:00 CEST 2008
            Check took: 594ms
            Error code: RESOURCE_ACCESS_FAILED
            Description: 32
You can also subscribe to the notifications made available by the SanityReport MBean to be informed of sanity check results. Please consult eXist-db's JMX documentation on how to configure this.
Client-side Backup
For client-side backups you can either use the Java Admin Client or the backup command line utility.
Using the Java Admin Client
If you are using the Java Admin Client, do the following:
Select either the Backup Icon (arrow pointed upward) in the toolbar or Tools, Backup from the menu.
From the
Collectiondrop-down menu, select the collection to backup. To backup the entire database, select/db.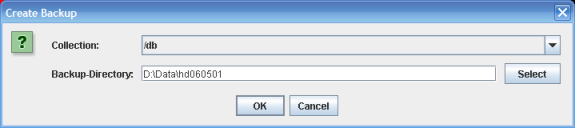
In the
Backup-Directoryfield enter where the backup must be stored. Use one of the following:A full directory path. The backup will be written on the file system
The name of a zip file (with a
.zipextension). The backup will stored as a zip.
Click OK.
Using the command-line utility
If you are using the command-line utility for the client-side backup/restore, do the following:
To launch the utility, do one of the following:
Run either the
bin/backup.sh(Linux/Unix) orbin\backup.bat(Windows) scriptEnter on the command-line (to view the all the available options use the
-hparameter):backup.sh --h Usage: backup.sh [Arguments] Arguments: -a, --overwrite-apps Overwrite newer applications installed in the database. Default: disabled -b, --backup <string> Backup the specified collection. <string>: any string Default: -d, --dir <path> Specify the directory to use for backups. <path>: a file path Default: . --deduplicate-blobs <boolean> Deduplicate BLOBS in the backup. <boolean>: true or false Default: false -h, --help <argument-to-print-help-for> <argument-to-print-help-for>: an argument to print help for. Default: If no specific parameter is given the whole usage text is given -o, --option<string>=<string> Specify extra options: property=value. For available properties see client.properties. <string>=<string>: where "<string>" is any string and "<string>" is any string Default: Empty map -p, --password <string> Set the password for connecting to the database. <string>: any string Default: -P, --dba-password <string> If the backup specifies a different password for the admin user, use this option to specify the new password. Otherwise you will get a permission denied. <string>: any string Default: -q, --quiet Be quiet. Just print errors. Default: disabled -r, --restore <path> Restore from the specified 'full' backup file in ZIP format, or read the specified __contents__.xml file and restore the resources described in there. <path>: a file path Default: . -R, --rebuild Rebuild the EXpath app repository after restore. Default: disabled -S, --use-ssl Use SSL by default for remote connections. Default: disabled -u, --user <string> Set user. <string>: any string Default: admin -U, --gui Start in GUI mode. Default: disabledTo view the all the available options use the
-hparameter.
For example, to backup the entire database on a Unix system to the target
directory /var/backup/hd060501, enter the following:
bin/backup.sh -u admin -p admin-pass -b /db -d /var/backup/hd060501
By default, the utility connects to the database at the URI:
xmldb:exist://localhost:8080/exist/xmlrpc. If you want to backup
a database at a different location, specify its XML:DB URI
(excluding any collection path) using the -ouri parameter. For
example:
bin/backup.sh -u admin -p admin-pass -b /db -d /var/backup/hd060501
                -ouri=xmldb:exist://192.168.1.2:80/xmlrpc
Default settings for the user, password or server URIs can also be set in the
backup.properties file.
If you want to connect to a database using SSL, use the parameter --use-ssl or
(shorter) -S:
bin/backup.sh -u admin -p admin-pass --use-ssl
                -ouri=xmldb:exist://example.org:443/exist/xmlrpc -b /db
NOTE: You still have to set the correct port (usually port 443), otherwise the client will attempt SSL to port 8080.
Restoring the Database
Restoring from a backup (or parts of it) does not mean that the existing data in the current database instance will be deleted entirely. The restore process will upload the collections and documents contained in the backup. Collections and documents which exist in the database but are not part of the backup will not be modified.
This is a feature, not a bug. It allows us to restore selected parts of the database without touching the rest.
If you really need to restore into a completely clean database, proceed as follows:
Stop the running eXist database instance
Change into directory
$EXIST_HOME/dataor another directory you specified as data directory in the configuration ($EXIST_HOME/etc/conf.xml).Remove all
.dbx,.lckand.logfiles. This means removing all your old data! eXist will recreate those files upon the next restart.Start eXist again and launch a restore.
To restore the database files from a backup, you can use either the Java Admin Client or the backup command line utility.
Restore using the Java Admin Client
For restoring a backup using the Java Admin Client, do the following:
Select either the Restore Icon (arrow pointed downward) in the toolbar or Tools, Restore from the menu.
The dialog box will prompt you to select the backup file to restore. Select one of the following:
The descriptor
__contents__.xmlfile from the topmost directory (Collection) you want to restore.A zip file containing the backup to restore.
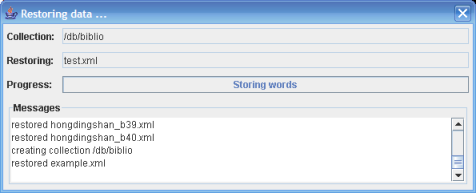
A second dialog box will prompt you for an admin password to use for the restore process. You may also request that newer versions of application packages already installed in the database should be overwritten by those contained in the backup. This is normally not desirable, but you can check the checkbox if you still wish to do so.
If the restore was accepted, a progress dialog box will display the restored files:
Using the Command Line
To restore from a backup using the command-line utility, please refer to Using the command-line utility.
Add the -r parameter and the full path to the
__contents__.xml file to restore. For example:
bin/backup.sh -u admin -p admin-pass -P backup-pass
                        -r /var/backup/hd060501/db/__contents__.xml
The restore process compares app packages contained in the backup with those already installed in the database. By default, older versions of
an application package contained in the backup will not be restored if a newer version is installed in the database. To change this behavior and
enforce an overwrite, pass parameter --overwrite-apps or -a.
Repairing the Package Repository After Restore
After a complete restore, your package repository will probably be out of sync.
The dashboard will not show all the packages you had previously installed, even
though their data collections have been restored (into /db/apps
by default). This happens because the package registry, which is stored on the file
system, is not part of a backup.
A manual repair step is required to get the package repository in sync again. This is implemented as an XQuery module, which you can run (via for instance eXide).
The repair module provides the following interface:
- repair:clean-all()
Unlinks all currently installed packages from the package manager without removing deployed data from the db.
- repair:repair()
Scan the app root collection in the db for deployed packages and register each of them with the package repository. This reconstructs the metadata for the package. The data stored in the db will not be modified in any way.
- repair:repair($collection)
Only try to repair the application whose deployed data is stored in the given collection.
After a complete restore into a clean database, the clean-all and repair functions would typically be combined in the following XQuery:
xquery version "3.0";

import module namespace repair="http://exist-db.org/xquery/repo/repair"
at "resource:org/exist/xquery/modules/expathrepo/repair.xql";

repair:clean-all(),
repair:repair()
Emergency Export Tool
eXist-db provides an emergency consistency check and backup utility. This tool is typically used if the database becomes corrupt and does not start up anymore.
This tool needs direct access to the database files, so you must stop the running database instance first if it is active.
Use the following command line to start the utility as a GUI:
Unix/Linux:
$EXIST_HOME/bin/export-gui.sh
Windows:
$EXIST_HOME\bin\export-gui.bat
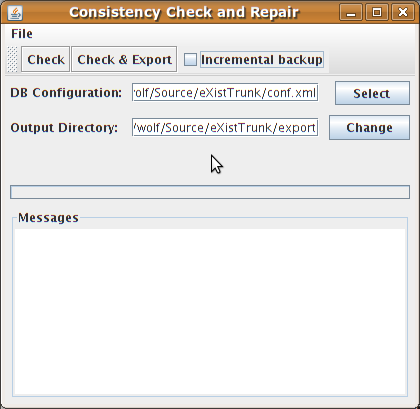
Click Check to run a consistency check only. An error report will be written into the directory specified in Output Directory. Click Check & Export to run a consistency check and a full backup.
On a headless system use the command-line version instead (The -h
parameter will get you a list of possible options):
Unix/Linux:
$EXIST_HOME/bin/export.sh
Windows:
$EXIST_HOME\bin\export.bat
Standalone Backup/Restore on Server Platforms
The instructions above assume you have a standard eXist installation in place, either from a release package or a full build environment. That is not always the case on remotely deployed server instances.
To support such deployment scenarios, there is a tool called
backrest, that makes it easier to do restores local to the deployed
server. The tool can be found in the sub-folder tools/backrest. You
can compile the tool by running ant in that folder.
Building the backrest tool will create a fully self-contained zip file in the
tools/backrest/dist/eXist-db-backrest-4.0.0/lib directory that can be
copied to a remote server and used to do both restores and backups local to that
server.
Just unzip the backrest zip file (preserving subdirectories) and execute
either the backup.bat or backup.sh scripts per the prior
instructions and parameter usage.